
Constructing the best GPC/SEC column set for your samples
If you’ve worked with GPC/SEC (like OMNISEC!), then you know that every analysis relies on a column set. And choosing the appropriate column set for your application can sometimes be a challenge. Occasionally, you may even need an entirely new column set for a second type of sample!
There are multiple things to consider when choosing the best column set for your samples. The molecular size/weight range, the compatibility of the columns with the mobile phase you need to use to dissolve your samples, and the compatibility of the stationary phase of the column with any functional groups on your sample are the main things to think about. If you are using multiple columns, then you need to consider if they complement each other, and what order they should be connected.
In this post I’ll provide general information about columns and offer some insight on how you can create a column set that will work for your samples. The information here will primarily pertain to choosing the best column set from a molecular size/weight range perspective. For information on columns available for analyses in various mobile phases, please see the post linked here and my webinar on the topic here.
What happens in the column set?!

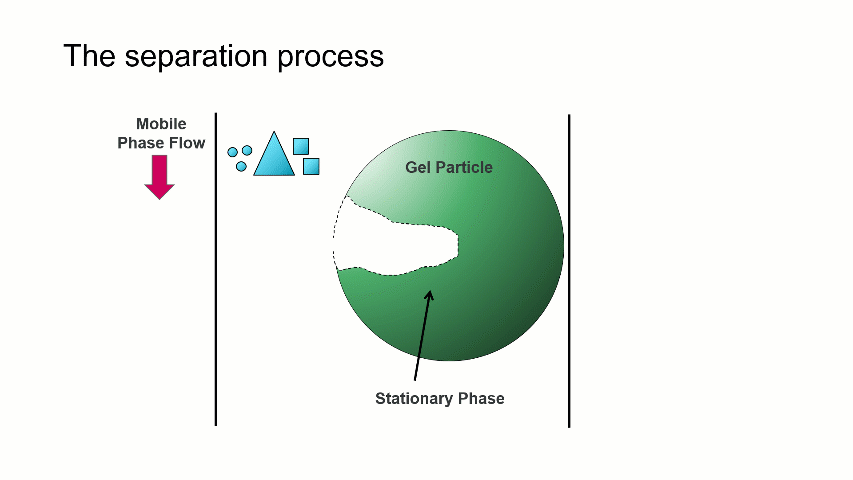
I want to start with a brief overview of how the separation within a GPC/SEC column set works. As shown in the image above, a dissolved mixture of two samples with different sizes is introduced onto the column. As time progresses, the two sample fractions and the dissolution solvent move through the column and different rates. The largest sized sample elutes first (Population 2), followed by the smaller sized sample (Population 1), with the dissolution solvent eluting last.
It is important to understand that the separation is based on the molecular size, and not molecular weight, of the sample!
The separation occurs because the stationary phase of the column consists of gel particles that have pores. These pores are large enough so that sample molecules diffuse into them as they pass through the column. The smaller molecules diffuse into the pores more easily, and thus spend more time in the pores than the medium and larger sized molecules. The largest molecules will not diffuse as easily into the pores, and thus have a more straightforward, and thus quicker, pathway through the column.
With GPC/SEC, the separation is based on molecular size and the large molecules elute first, followed by the intermediate and smaller molecules. This process is depicted with the crude animation below, in which the large triangles don’t spend much time diffusing into the pore and elute first, followed by the intermediate squares, and last by the small circles, which can easily move into the pore.
Mixed bed and single pore size columns
The difference between these two types of columns is detailed in this post. To briefly summarize: mixed bed columns contain a stationary phase gel with a mixture of particle and pore sizes to provide resolution over a wide molecular size/weight range. Single pore size columns contain a stationary phase gel that is homogenous, and thus provides excellent resolution over a relatively limited molecular size/weight range.
Combining columns to make a set
To create a column set optimized for your samples, you will likely want to combine two or more columns. However, if one column can provide sufficient resolution for your sample and is all you need – great! This will save you time and mobile phase. This is often the case for protein samples; even though the molecular weights of proteins cover a wide range, due to their folded structures, the size range of protein samples is narrower than that of polymers.
When combining columns to create a set there are three general approaches I take. Please understand you are not limited by these! I simply wanted to share them because they’ve worked well for me.
Two mixed bed columns: This is the most common general-purpose column set I use, with organic, aqueous, even specialty columns. To be clear, I’ll use two of the same mixed bed columns. For example, when analyzing a batch of polysaccharides, I’ll often use 2 x A6000M columns, our mixed bed column for aqueous analyses. Using two mixed bed columns like this tends to hit the sweet spot of maximizing molecular size/weight range and keeping the run times around 45 minutes or below.
Combine high/low MW column with a mixed bed column: For samples in which a species of especially high or low molecular size/weight is present, such as aggregates or oligomers, respectively, I like to add a high/low single pore size column to a single mixed bed column. The high/low molecular weight single pore size column ensures there is sufficient resolution for the specific feature of the sample on one of the extremes of the molecular size continuum, while the mixed bed column accounts for the rest of sample material. Sometimes I’ll add a low molecular weight column to a mixed bed column if I want to improve resolution between the sample and the solvent peaks.
Combine multiple single pore size columns: This strategy works well if you know you don’t need the entire molecular size/weight range resolution afforded by a mixed bed column. This type of column set can be advantageous in environments where you’re monitoring a similar sample, such as QC. The advantage is that you can obtain maximum resolution in the molecular size/weight relevant to your sample. You can also combine more than two single pore size columns to cover a broad molecular size/weight range, such as T5000 + T3000 + T1000. In this example, the analysis time will be extended, but will offer increased resolution.
When combining single pore size columns, it is important to ensure that your columns are no more than one column apart. This way you can avoid having gaps in your resolution range. To revisit the example above with the three single pore size columns, I would not recommend simply combining the T5000 + T1000. The gap between the resolution ranges could produce an elution profile like the one shown below which can introduce odd peak shapes and artifacts into your data that result from the chromatography, not the sample.

Order of columns
A common question I receive is: When combining columns, in what order should I connect them?
I’m not sure there is an official answer, but what makes sense to me is to start with the highest molecular size/weight column and then descend to the lowest molecular size/weight column. This way, when the entire sample mixture is first introduced to the column set, the largest molecules can begin to separate out. If the columns were arranged low to high, then the largest molecules would have to squeeze through the low molecular size/weight column and can potentially disrupt the diffusion of the smaller molecules into the pores.
That’s why in the example I used above I ordered the columns T5000 + T3000 + T1000. When combing a single pore size column to a mixed bed column, I would add a higher molecular size/weight single pore size column before the mixed bed column, and I would add a lower molecular size/weight single pore size column after the mixed bed column.
Final thoughts
I hope the information in this post helps the next time you need to choose a column set to analyze your samples. You’ll have the best chance of success if you consider all aspects of column-application compatibility. However, sometimes you won’t know how it’ll work until you try it out. If you have any questions, please don’t hesitate to contact us or email me directly at kyle.williams@malvernpanalytical.com.
Related content